Explaining Soperator, Nebius’ open-source Kubernetes operator for Slurm
Explaining Soperator, Nebius’ open-source Kubernetes operator for Slurm
We’ve built an open-source Kubernetes operator that runs and manages Slurm clusters as Kubernetes resources. From this article, you’ll find out how the community tackled this task previously and the details of the architecture of our solution, which we named Soperator.
My name is Mikhail Mokrushin, I’m the Managed Schedulers Team Leader at Nebius and the primary contributor to Soperator. In this article, I’ll share the details of this open project. I won’t rehash what Slurm and Kubernetes are, their differences, or how to use them for computational jobs — all of that was covered in the previous post. Instead, I’ll focus on methods for combining Slurm and K8s and on the architectural approach we’ve chosen to bring these two systems together. Soperator is available on GitHub under the Apache 2.0 license.
Marrying Slurm and Kubernetes
Both Slurm and Kubernetes can be used for distributed model training and high-performance computing (HPC) in general. Like any system, they each have their strengths and weaknesses. In this case, though, the trade-offs are pretty significant.
It’s a shame there’s no easy way to get the best of both worlds: Slurm’s efficient scheduling and granular hardware control, combined with Kubernetes’ universality, autoscaling and self-healing capabilities. Some ML engineers working in big tech don’t even have a choice — Kubernetes is their company’s default infrastructure layer, and there’s no support for a separate model training system. Those determined enough to manage a separate Slurm cluster face a new challenge: they can’t share expensive computational resources between the two workload managers. That’s why many companies wrestle with how to make these two play nice together.
Let’s look at a few approaches that could theoretically unite Slurm and Kubernetes, taking the best from both.
Kubernetes-first
The most obvious approach is to run Slurm nodes directly in a Kubernetes cluster (by implementing a Kubernetes operator). While there have been several attempts, none have been successful (at least in the open-source world).
The problem is that these solutions usually force users to change how they interact with Slurm. Kubernetes is built for orchestrating “cloud-native” containerized applications, but Slurm doesn’t fit that mold. In a typical Slurm setup, node filesystems are usually persistent: people install software, create Linux users and groups and store configs, batch scripts, job outputs and all sorts of other stuff there. But in Kubernetes, container filesystems are ephemeral. Many changes require rebuilding the container image and restarting the entire HPC cluster (if Slurm nodes are represented as Kubernetes Pods), which is a nightmare for model training. These solutions often force users to run their jobs in containers, too. Unfortunately, not all HPC job submitters are well-versed in containers and the cloud native philosophy.
Slurm-first
The second approach involves running Kubernetes nodes as Slurm jobs. It sounds weird, and it is. It’s not really feasible (at least not well) without patching Slurm, because Slurm jobs have a maximum execution time of one year.
My engineering intuition also tells me this approach isn’t the best: it might be fine to run finite workloads in an environment designed for infinite ones, but not the other way around.
Another downside of this approach is that it’s hardly compatible with the many managed solutions for Kubernetes out there — not everyone’s brave enough to maintain an on-premise installation.
Peering
This is theoretically the cleanest solution, requiring the least number of workarounds.
Instead of running one system inside the other, it integrates them so they can share the computational resources. For example, thanks to Slurm’s modular design, it’s possible to create a scheduling plugin that connects Slurm to Kubernetes and launches jobs there as Pods. This leaves the base Slurm setup untouched.
SchedMD, the folks behind Slurm, are already working on such a solution called Slinky. As I write this, it hasn’t been released yet (so I may be off on some details), but we’re looking forward to it.
While this approach is neat and quite universal, it still requires Slurm users to change how they interact with Slurm, which isn’t ideal for everyone.
Our solution
At Nebius, we decided to go with the Kubernetes-first approach. At the same time, we’ve designed the system to preserve the familiar user experience while staying true to cloud-native principles. This has allowed us to add some features that many users found lacking in vanilla Slurm installations.
Here’s a high-level view of our solution, showing how a Slurm cluster is represented using Kubernetes resources:
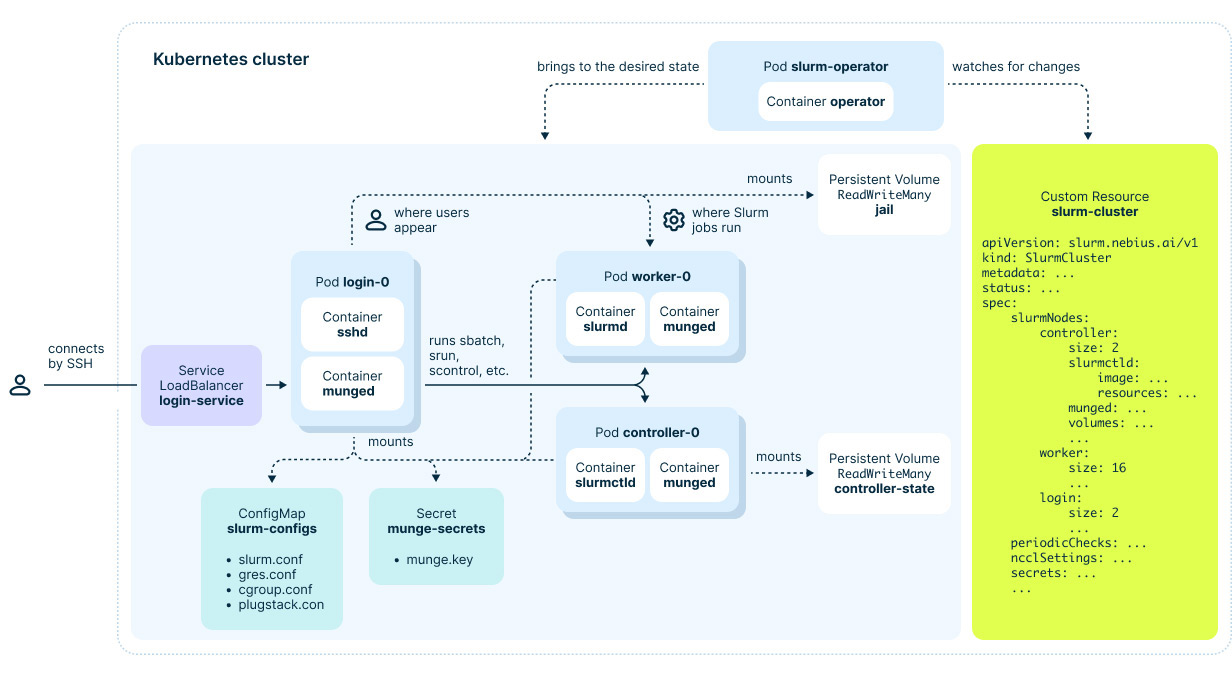
Figure 1. Top-level architecture of Soperator
At first glance, our operator works like you’d expect. It takes your desired Slurm cluster state (specified in YAML) and brings the Kubernetes resources in line. During this process, it might bootstrap new Slurm nodes, change container images, update config files, mount new volumes and so on.
The Slurm clusters we create have three types of nodes: Login, Controller and Worker (a.k.a. Compute), all represented as Kubernetes Pods.
Login nodes are load-balanced — each time a user connects to the cluster via SSH, they’re directed to a random node.
While all containers have ephemeral filesystems (changes are lost after node restarts), we use Kubernetes Persistent Volumes to keep data around.
The real magic of Soperator lies in how we use “jail” Persistent Volume. This shared filesystem is mounted on all Worker and Login nodes and contains another root directory, possibly of a different Linux distribution.
When users interact with the Slurm cluster (like browsing the filesystem in an SSH session or running a Slurm job), they actually see this shared filesystem as their root “/” directory. This trick not only gives users a familiar Slurm experience but also actively makes their lives easier: they no longer have to keep filesystems identical across all nodes. They can install new software packages, create Linux users, write job outputs or checkpoint their model on one node, and those changes automatically show up on all the other nodes.
Features and reasoning
Below, you’ll find a detailed description of all the features we bring to Slurm through our integration with Kubernetes.
Shared root filesystem
As I mentioned, all Login and Worker nodes share the same root filesystem from the user’s perspective. Combined with K8s containers, this takes away the headache of keeping nodes in sync. We call the environment where users do their work the “jail”.
“Host” environments are separate for each Slurm node, but they’re just pod containers — if something goes wrong, you can restart them and get back to square one.
If you’re into recursion, you can still run your jobs in another layer of containerization. The current version of the operator supports Pyxis plugin for this.
How we implemented this
For Linux gurus, this solution may sound a bit out there. Linux isn’t built to share its root filesystem. That’s true, which is why the filesystem isn’t entirely shared — some directories are local to each node. These include /dev, containing device drivers; /tmp, containing temporary files stored in RAM; /proc, containing information about running processes; /run, containing runtime variable data; and others. Some low-level libraries, device drivers and system configs are also not shared, though they’re identical — propagated (bind-mounted) from each host’s environment.
Here’s a diagram that tries to explain this concept visually:
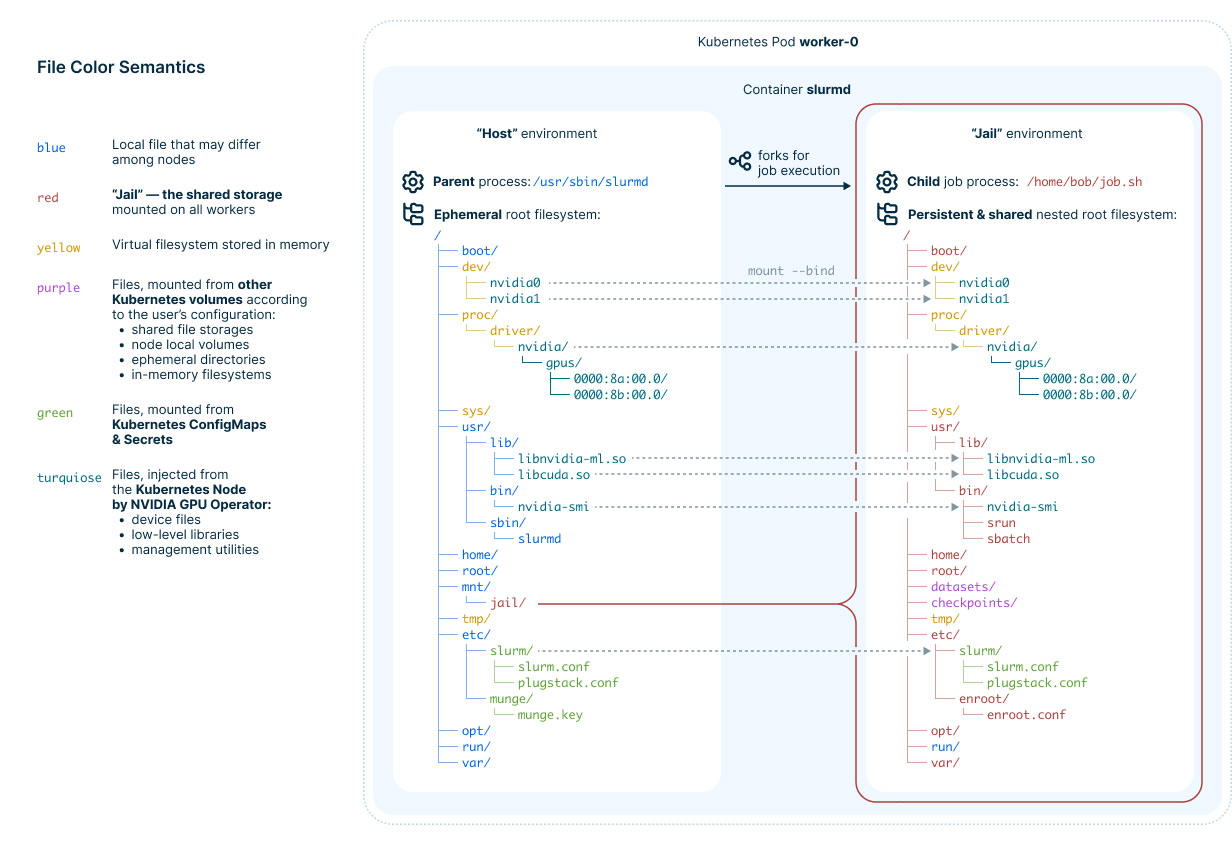
Figure 2. How we implemented shared root filesystem
While this approach won’t work for sharing the rootfs of an arbitrary Linux system, it should cover what Slurm users typically need. They usually don’t create new daemons or install device drivers between job submissions. Our Kubernetes operator can explicitly support such operations, but what users need often is always available.
Another consideration is the performance of shared filesystems, which is significantly worse than that of local ones. This can be solved by storing sensitive data on non-shared (or even in-memory) local filesystems mounted to subpaths inside the jail’s root, leaving other data on shared storage. Our operator supports such setups.
To move Slurm job processes from the host to the jail environment, we wrote a SPANK plugin that runs after forking the Slurm worker daemon slurmd, but before launching the job’s command. Our routine creates and enters new Linux namespaces, then changes the root directory the job process sees (using the pivot_root system call). All existing container runtimes, such as Docker or containerd, use a similar, though more complex, isolation method.
This plugin isn’t bound to our setup and could theoretically work in typical (non-Kubernetes) Slurm installations.
We use a different approach to change the root directory for user-established SSH sessions to Login nodes. We simply use OpenSSH’s ChrootDirectory feature.
Surprisingly (even for us!), it actually works.
In fact, the jail environment doesn’t have to be shared. It’s theoretically possible to have a separate persistent volume for each node while keeping all other approaches (Slurm plugin & ChrootDirectory). Users would again need to maintain nodes in an identical state, but the filesystem would be snappier. We’ll add support for this if there’s demand.
GPU health checks
This feature is specific to computations that use modern ML-tailored GPUs. It addresses the fact that these devices aren’t the most reliable and tend to fail under constant load.
This is especially true for large clusters. Check out Meta’s story, where a small issue with one GPU led to a 50% performance drop across their entire 16,000-GPU cluster for several hours. Imagine the cost. That’s why it’s so important to monitor hardware and take suspicious hosts offline quickly.
We tackle this by running periodic GPU health checks. If any Slurm node fails the check, our operator “drains” it, effectively removing the node from the pool for new job scheduling.
In the future, we’re planning to integrate with Nebius to not only drain problematic Slurm nodes but replace them with fresh ones. We’ll also try to leave room for integration with other cloud providers.
How we implemented this
There are two kinds of health checks in our solution:
-
Quick checks that take up to 10 seconds and don’t interfere with user workloads when run in parallel. These are implemented as Slurm’s HealthCheckProgram. They make sure the system recognizes GPUs correctly and there are no critical software or hardware issues.
-
Longer checks that take several minutes and run as regular Slurm jobs. Currently, we only have one such check that runs NCCL benchmarks. These checks queue up with user jobs and don’t interfere with them.
Here’s a diagram explaining how longer checks work. It’s not 100% accurate (especially the bash scripts), but it gives you the general idea:
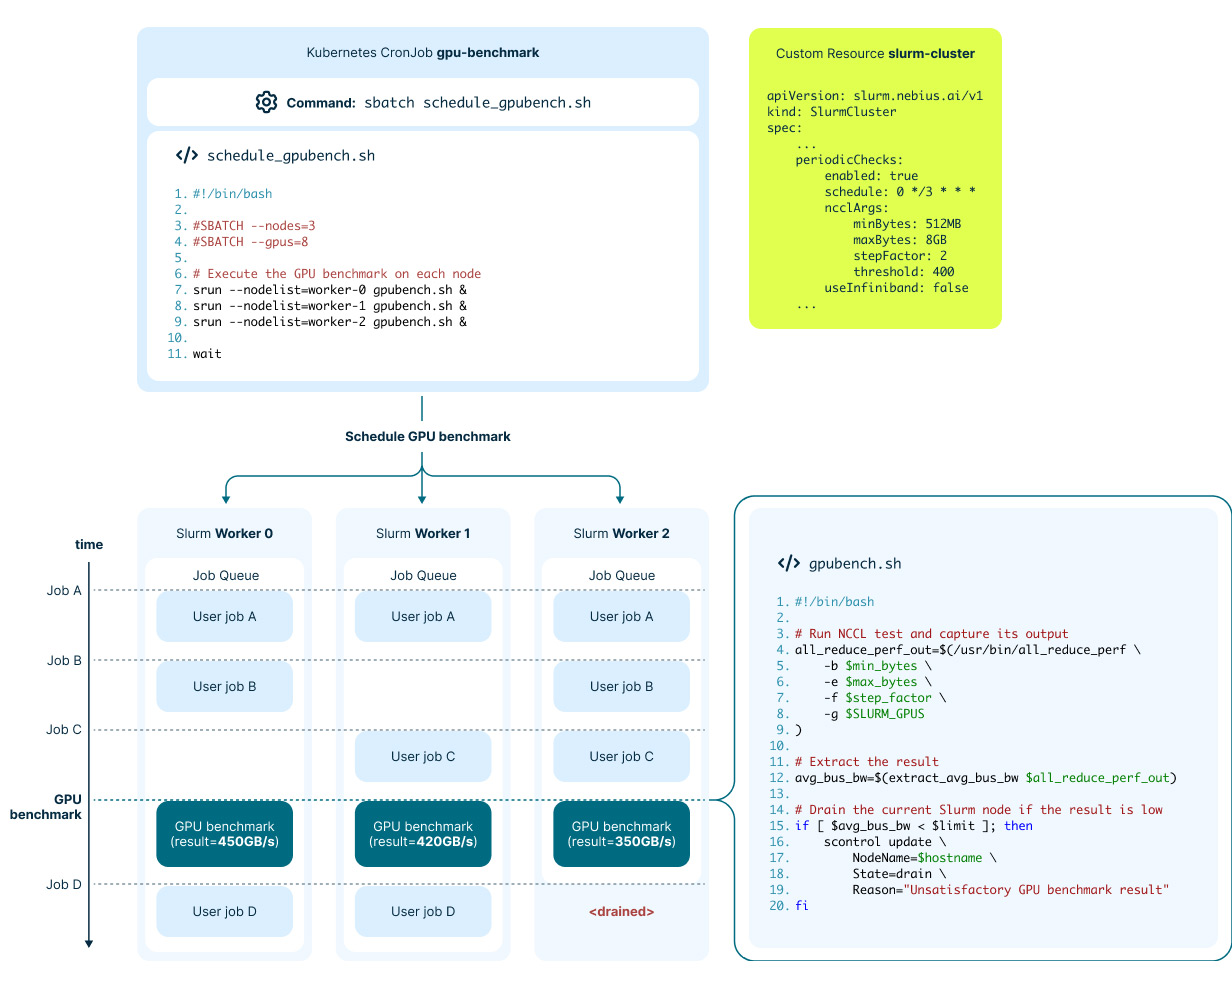
Figure 3. How longer GPU health checks work
Our operator creates a Kubernetes CronJob that launches benchmarks on each node on a set schedule.
The benchmark job consists of running the NCCL all_reduce_perf test and comparing the resulting bus bandwidth to a configured threshold. If the result doesn’t meet the mark, the job itself changes the state of the current node to DRAINED, excluding it from running further jobs.
Easy scaling
ML product development often involves several stages, each needing different levels of computing power. Sometimes, you need heavy-duty training; other times, just small experiments. Keeping (and paying for) the maximum hardware you might ever need is expensive and wasteful. If you’re feeling altruistic, here’s another reason: when you hog hardware resources you’re not using, other companies can’t access them because the global supply is limited. That’s why it’s very important to give users an easy way to scale their clusters based on current needs. As a bonus, it lets us oversell our hardware.
This isn’t something we needed to work on specifically — we got it for free just by hosting Slurm in Kubernetes. However, the shared-root feature makes scaling easier because you don’t need to set up new node environments.
The following diagram illustrates this concept:
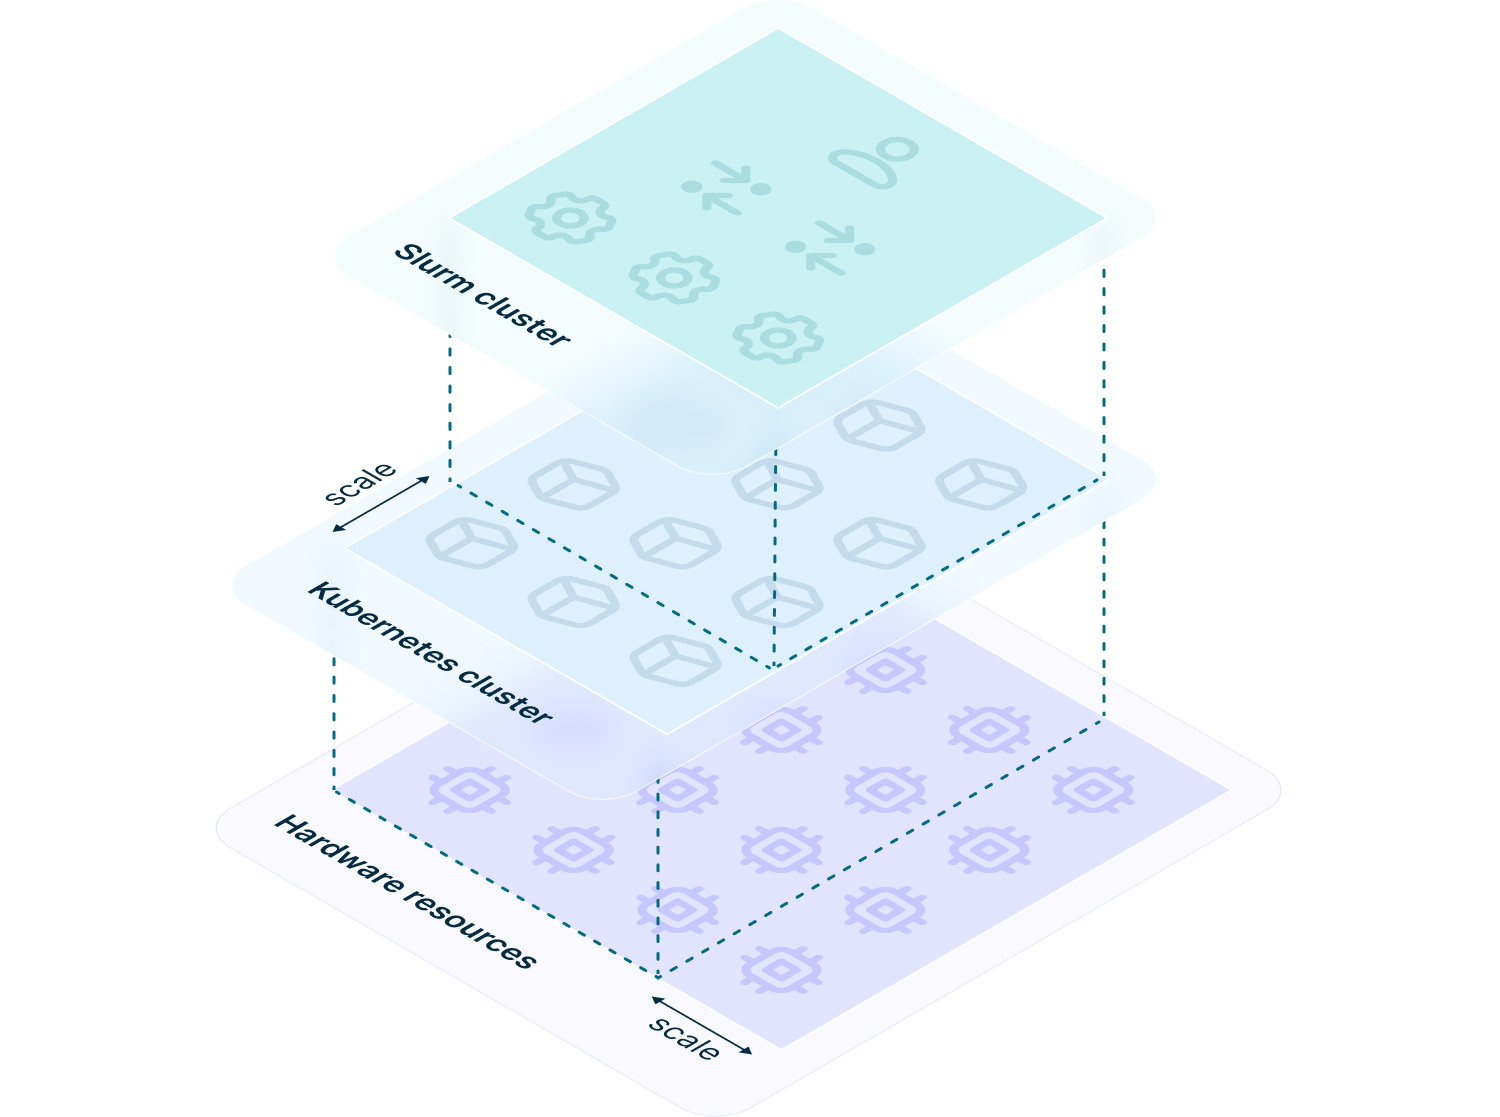
Figure 4. How scalability of Slurm running in Kubernetes works
First, we leverage Kubernetes’ ability (available on most cloud platforms) to auto-scale the cluster based on current needs.
Second, we group Slurm nodes (represented as pods) into scalable entities called StatefulSets and allow users to adjust their sizes through our Slurm cluster definition.
You can simply change a single value in the YAML manifest and watch your cluster grow or shrink.
Other features
High availability
Kubernetes brings some HA features out of the box. If some Pod or container dies (e.g., the Slurm controller), Kubernetes recreates it. This helps administrators of large clusters sleep better at night.
Our operator takes this a step further, constantly working to keep the entire cluster in the desired state.
Isolation of user actions
Another nice side effect of the “jail” environment is that users can’t accidentally break the Slurm cluster itself — all their actions are isolated within the jail. They can even have superuser rights inside the jail without having them on the host. This clearly separates the administrator’s (or managed service’s) responsibilities from the users’.
I say accidentally because, at the moment, determined users could still damage the cluster if they really tried. Improving security and isolation is on our to-do list. Right now, we only create a mount Linux namespace for user jobs, but we plan to add other types as well.
Easy bootstrapping
Soperator makes it a breeze to bootstrap new Slurm clusters quickly and consistently. Here’s what you need to do:
-
Set up your shared storage solution. You can deploy an NFS server, GlusterFS, OpenEBS or whatever you prefer. Our operator just needs the resulting PVC name.
-
Apply our Helm chart to deploy the operator to your Kubernetes cluster.
-
Finally, apply another Helm chart to create a SlurmCluster Custom Resource. Repeat this step if you need more than one cluster.
We also provide a Terraform recipe for our cloud that makes it even simpler: all you have to do is apply it. Setting up a Slurm cluster (including a Kubernetes cluster, a virtual network, shared storage, etc.) takes about 20–30 minutes. Similar solutions could be developed for other cloud providers too.
Observability
Our operator integrates with a monitoring stack that can be installed separately (though we provide Helm charts for that, too). It collects various Slurm stats and hardware utilization metrics. Users can view this information on the dashboards we provide.
Current limitations
Soperator is still very new, and during development, we had to prioritize — what to tackle now and what can wait. First of all, we focused on what our cloud customers needed.
If you need something we haven’t implemented yet, don’t hesitate to contribute. Or become our customer, and we’ll do our best to meet your needs as quickly as possible.
Here’s a list of some key limitations we’re aware of:
-
GPUs are required. Although supporting CPU-only clusters or partitions seems pretty straightforward, we haven’t gotten around to it yet.
-
No Terraform recipes for other clouds. We currently only provide a Terraform recipe for our cloud.
-
Scaling clusters down. While you can easily change the number of worker nodes by tweaking a value in the YAML manifest, it only works smoothly when scaling up. If you try to scale the cluster down, you’ll find that the deleted nodes remain in the Slurm controller’s memory (and show up in
sinfooutput, for example). You can manually remove them (using scontrol) if they bug you. -
Software versions. Our list of supported software versions is pretty short right now. The only Linux distribution we support is Ubuntu (versions 20.04 and 22.04). Allowed Slurm versions are 23.11.6 and 24.05.3. The only supported CUDA version is 12.2.2. Our solution also relies on some Kubernetes features added in version 1.28. The versions of some software packages we pre-install in the jail environment are also fixed and can’t be changed.
Future plans
We built this solution, with all the features described above, in just three months, and we’ve got ambitious plans for the future.
Here’s a peek at some important features we’re planning to implement next. Some will come sooner, some later — it depends on what the community and our cloud users need most.
-
Slurm accounting. You might have noticed the architecture diagram doesn’t show an accounting database or daemon. We actually don’t support accounting yet, which means users miss out on its extensive capabilities. We’re already working on adding this.
-
Better security & isolation. While it’s technically possible to isolate the user environment (“jail”) from the system environments (“hosts”) quite effectively, we’re not using all the available techniques just yet. One important security consideration is that most containers our operator creates are currently “privileged.”
-
On-demand nodes. While it’s already pretty easy to scale your Slurm cluster up or down, we’re not stopping here. We want to automatically bootstrap new compute nodes (within configured limits) when there are queued jobs that need them.
-
Network topology-aware job scheduling. Thanks to Slurm’s topology feature, we can support detailed configuration of the network topology to make your distributed crypto mining even faster.
-
Automatic replacement of underperforming nodes. Right now, our solution only drains Slurm nodes that fail health checks, leaving it up to the user to deal with them. We’re planning to implement fully automatic replacement of such nodes.
-
Jail backups. While the shared-root feature makes your life easier, it also increases the risk of breaking the filesystem for the entire cluster. So we’re going to backup jails periodically to improve the durability of our Slurm clusters.
-
Automatic external checkpointing. There is a promising (though still experimental) project called cuda-checkpoint. It allows you to take external checkpoints of Linux processes that use GPUs, saving them to the filesystem so you can resume them later. Integrating this with Slurm could free users from writing complex application-level code for checkpointing.
Ways to try it
GitHub repositories
We’ve open-sourced Soperator across three GitHub repositories:
-
nebius/soperator — This is the main repo containing our operator’s source code and Helm charts for deployment.
-
nebius/slurm-deb-packages — We use this repo to build some open-source code (such as Slurm or NCCL) and publish packages in GitHub releases. You’re welcome to use it even if you’re not interested in our Soperator solution.
-
nebius/soperator-terraform — Here, you’ll find the terraform recipe for easily deploying Soperator to our cloud.
If you’ve found a bug or you’re interested in a feature but aren’t ready to implement it yourself, create an issue in the appropriate repository. See you at the code review!
Deploying to any Kubernetes cluster
You can install Soperator in any Kubernetes cluster, whether it’s on-premise or in the cloud. But there are a few prerequisites:
-
The Kubernetes cluster needs to use Cilium.
-
You need a shared storage solution. Our operator only needs a PVC name from you, but this PVC should have
ReadWriteManyaccess mode. NFS is the simplest option, or you could deploy OpenEBS/GlusterFS if you need more performance. If you’re using a cloud provider, they might offer a shared filesystem solution. -
At the moment, you’ll need GPUs on your hosts. While it should work with various models, we’ve only tested with V100, A100 and H100.
-
If your GPU cluster uses Ethernet for intra-cluster communication, you might need some additional tweaks to make NCCL use it. InfiniBand networks should work out of the box.
You can find more detailed instructions here.
Deploying to Nebius
We guarantee Soperator will work smoothly in our cloud, and we provide a ready-to-use Terraform recipe.
All you need to do is configure the cluster to your liking (though the defaults will also work) and run terraform apply. This will create a Kubernetes cluster, virtual network, static IP address and a distributed filesystem optimized for concurrent reads and writes from multiple hosts.
Explore Nebius

Contents