Authentication using Active Directory
With an identity federation, you can use Active Directory Federation Services (AD FS) to get authenticated in the cloud.
To set up authentication:
Getting started
To follow the steps in this section, you will need:
-
Working AD FS farm. If you did not configure AD FS on your server, install and configure it now. To deploy AD FS, you also need to install and configure Active Directory Domain Services (AD DS).
Tip
We recommend that you include more than one server in the farm to ensure more reliable authentication.
-
Valid certificate used for signing in the AD FS service. If you do not have a valid SSL certificate, get one.
The subject name in the certificate must contain the FQDN of the Identity Provider (IdP) server, for example,
fs.contoso.com, to prevent the browser from blocking the authentication page.
Create a federation in your organization
To create a federation:
-
Go to Cloud Organization.
-
In the left-hand panel, select Federations .
-
Click Create federation.
-
Give your federation a name. It must be unique within the folder.
-
You can also add a description, if required.
-
In the Cookie lifetime field, specify the period of time that must elapse before the browser asks the user to re-authenticate.
-
In the IdP Issuer field, enter a link in
http://<ADFS>/adfs/services/trustformat, where<ADFS>is the FQDN of your AD FS server. -
In the SSO method field, choose POST.
-
In the Link to the IdP login page field, enter a link in
https://<ADFS>/adfs/ls/format, where<ADFS>is the FQDN of your AD FS server.You can only use HTTP and HTTPS in a link.
-
Enable Automatically create users to add authenticated users to your organization automatically. If you do not enable this option, you will need to manually add your federated users.
A federated user is created automatically only when they log in to a cloud for the first time. If you deleted a user from a federation, you can only add them back manually.
If you don't have the Nebius AI command line interface yet, install and initialize it.
The folder specified in the CLI profile is used by default. You can specify a different folder using the --folder-name or --folder-id parameter.
-
See the description of the create federation command:
ncp organization-manager federation saml create --help -
Create a federation:
ncp organization-manager federation saml create --name my-federation \
    --organization-id <organization ID> \
    --auto-create-account-on-login \
    --cookie-max-age 12h \
    --issuer "http://example.com/adfs/services/trust" \
    --sso-binding POST \
    --sso-url "https://example.com/adfs/ls/" \
    --force-authn
Where:
-
name: Federation name. It must be unique within the folder. -
organization-id: Your organization ID. -
auto-create-account-on-login: Flag to enable the automatic creation of new cloud users following authentication on the IdP server.
This option makes it easier to create users; however, users created this way will not be able to do anything with cloud resources.If this option is disabled, users who are not added to the organization cannot log in to the management console, even if they authenticate with your server. In this case, you can manage a list of users allowed to use Nebius AI resources.
-
cookie-max-age: Time that must elapse before the browser asks the user to re-authenticate. -
issuer: IdP server ID to be used for authentication.Enter a link in
http://<ADFS>/adfs/services/trustformat, where<ADFS>is the FQDN of your AD FS server. -
sso-url: URL of the page that the browser redirects the user to for authentication.Enter a link in
https://<ADFS>/adfs/ls/format, where<ADFS>is the FQDN of your AD FS server.You can only use HTTP and HTTPS in a link.
-
sso-binding: Specify the Single Sign-on binding type. Most Identity Providers support thePOSTbinding type. -
force-authn: Flag that requires user re-authentication once a session expires in Nebius AI.
-
Specify certificates for the federation
When the identity provider (IdP) informs Cloud Organization that a user has been authenticated, they sign the message with their certificate. To enable Cloud Organization to verify this certificate, add it to the created federation.
To get an AD FS certificate:
-
Log in to your AD FS server and open Server Manager.
-
Open the AD FS management console: Tools → AD FS Management.
-
In the window that opens, click Services → Certificates in the tree on the left.
-
Right-click the certificate in the Token-signing section and select View certificate.
-
In the window that opens, go to the Details tab.
-
Click the Copy to file button.
-
Click Next.
-
Select the format Base-64 encoded X.509 (.CER) and click Next.
-
Specify where to save the certificate and under what name, then click Next.
-
Check the certificate export settings and click Finish.
To add a certificate to a federation:
-
Go to Cloud Organization.
-
In the left-hand panel, select Federations .
-
Click the name of the federation to add a certificate to.
-
At the bottom of the page, click Add certificate.
-
Enter certificate name and description.
-
Choose how to add a certificate:
- To add a certificate as a file, click Choose a file and specify the path to it.
- To paste the contents of a copied certificate, select the Text method and paste the contents.
-
Click Add.
If you don't have the Nebius AI command line interface yet, install and initialize it.
The folder specified in the CLI profile is used by default. You can specify a different folder using the --folder-name or --folder-id parameter.
-
View a description of the add certificate command:
ncp organization-manager federation saml certificate create --help -
Add a federation certificate by specifying the certificate file path:
ncp organization-manager federation saml certificate create --federation-name my-federation \
  --name "my-certificate" \
  --certificate-file test.pem
Tip
To ensure the authentication is not interrupted when the certificate expires, we recommend adding multiple certificates to the federation, i.e., both the current one and those to be used afterwards. If a certificate turns out to be invalid, Nebius AI will attempt to verify the signature with another certificate.
Configure authentication on the AD FS server
After you set up the federation in Cloud Organization, you can configure the AD FS server to notify the management console of each successful authentication session and redirect the user back to the management console.
The instructions in this section are written for Windows Server 2016 (different steps might be needed for other versions).
To set up authentication on the AD FS server:
Create a relying party trust
AD FS requires a relying party trust for each Service Provider (SP) that uses AD FS for authentication.
Create a relying party trust for the federation you created in the cloud:
-
Log in to your AD FS server and open Server Manager.
-
Open the AD FS management console: Tools → AD FS Management.
-
In the list of actions, select Add Relying Party Trust.
-
The wizard window opens. On the first page, select Claims aware and click Start.
-
Select Enter data about the relying party manually and click Next.
-
Enter a name, e.g.,
Nebius AI
and click Next. -
In the next step, you are asked to specify a certificate for signing tokens. This step is optional, so click Next.
-
In the Configure URL step, select Enable support for the SAML 2.0 WebSSO protocol and specify the URL to redirect users to after successful authentication:
https://console.nebius.ai/federations/<federation_ID>How to get a federation ID-
Go to Cloud Organization.
-
In the left-hand panel, select Federations .
-
Copy the ID of the federation you are configuring access for.
Then click Next.
-
-
On the next page, enter the same redirect URL as an identifier and click Add. Then click Next.
-
On the next page, you can choose who can authenticate using this federation. By default, the Permit for everyone policy is selected enabling access for all users.
You can choose a different policy. For example, to grant access to a specific group of users, select Permit specific group and click on the word
<parameter>to select the groups to allow access to. Read more about access control policies.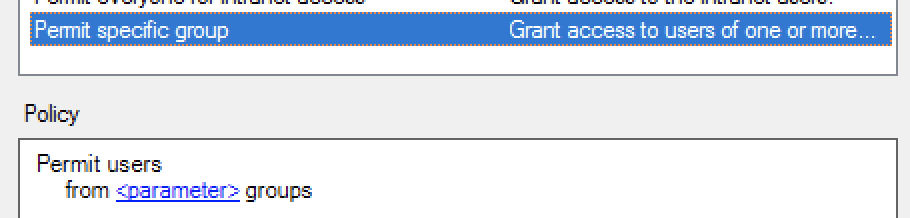
-
Click Next.
-
On the Ready to Add Trust page, check the data entered and click Close.
Configure Claims Mapping
When AD FS authenticates a user, it sends a SAML message to Nebius AI to confirm successful authentication. The message must contain the name ID that uniquely identifies the user and may also contain some other user data, such as the user's name or email address. Make sure to set up a mapping between the user attributes and Outgoing Claim Types. Types of personal data supported by Cloud Organization are given below.
| User data | Comment | Outgoing Claim Type |
|---|---|---|
| Unique user ID | Required attribute. We recommend using the User-Principal-Name or email address. | Name ID |
| Last name | Displayed in Nebius AI services. We recommend using the Surname attribute. Value length limit: 64 characters. |
Surname |
| First name | Displayed in Nebius AI services. We recommend using the Given-Name attribute. Value length limit: 64 characters. |
Given Name |
| Full name | Displayed in Nebius AI services. Example: John Smith. We recommend using the Display-Name attribute. Value length limit: 64 characters. |
Name |
Used to send notifications from Nebius AI services. Example: smith@example.comWe recommend using the E-Mail-Address attribute. Value length limit: 256 characters. |
E-Mail Address | |
| Phone | Used to send notifications from Nebius AI services. Example: We recommend using the Telephone-Number attribute.Value length limit: 64 characters. |
Type phone in the Outgoing Claim Type field |
| Profile image | Displayed in Nebius AI services. We recommend using the thumbnailPhoto attribute. How to add a profile image.Value length limit: 204800 characters. |
Type thumbnailPhoto in the Outgoing Claim Type field |
Warning
The name ID must be unique for every federation user. We recommend specifying the User Principal Name (UPN) or email address as the ID.
The thumbnailPhoto attribute value exceeding the length limit is ignored. If the value of a different attribute exceeds the limit, the value part that goes beyond the limit is truncated.
To set up a mapping between the user data and Outgoing Claim Types:
-
In the AD FS management console under Relying Party Trusts, right-click on the relying party trust created earlier and select Edit Claim Issuance Policy.
-
In the window that opens, click Add Rule.
-
Select Send LDAP Attributes as Claims and click Next.
-
On the next page, set up the data to send in the message:
-
In the Claim rule name field, enter a name for the rule, e.g.,
Claims mapping. -
In the Attribute Store field, click Active Directory.
-
Specify what the server will return as the name ID to uniquely identify the user. To do this, add a line to the Mapping of LDAP attributes list:
In the LDAP Attribute column, select User-Principal-Name or E-Mail Addresses.
In the Outgoing Claim Type column, select Name ID.
-
For a user to be able to contact Nebius AI technical support from the management console, add the user's email address (the E-Mail Address claim type) or name (the Name claim type).
-
To provide the user's first and last name separately, add the Given Name and Surname claim types.
-
To add the user's phone number or profile image, enter the
phoneorthumbnailPhototype, respectively, in the Outgoing Claim Type field.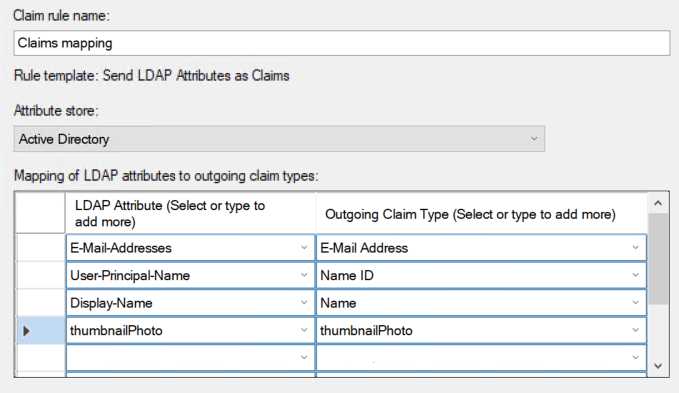
-
-
Click Finish, then click OK to close the Edit Claim Issuance Policy window.
How to add a profile image to Active Directory
To add a user's profile image to Active Directory, write the image to the thumbnailPhoto attribute using PowerShell.
Note
The thumbnailPhoto attribute supports files of up to 100 KB. The recommended file size is up to 10 KB and image size up to 96×96 pixels.
-
Start PowerShell.
-
Connect the Active Directory Module for Windows PowerShell with the command:
Import-Module ActiveDirectory -
To add a profile image for a single user, run the command:
Set-ADUser <username> -Replace @{thumbnailPhoto=([byte[]](Get-Content "<image path>" -Encoding byte))} -
To bulk add profile images for multiple users:
-
Create a CSV file with a list of usernames and image paths.
Sample CSV file:
AD_username, Photo smith, C:\Photo\smith.jpg jones, C:\Photo\jones.jpg -
Run this command:
Import-Csv <CSV file path> |%{Set-ADUser -Identity $_.AD_username -Replace @{thumbnailPhoto=([byte[]](Get-Content $_.Photo -Encoding byte))}}
-
Add users to your organization
If you did not enable the Automatically create users option when creating a federation, you will have to add federated users to your organization manually.
To do this, you need to know the name IDs of the users that the Identity Provider Server (IdP) returns along with the successful authentication confirmation. This is usually the user's primary email address. If you do not know what the server returns as the name ID, contact the administrator who configured authentication for your federation.
If the Automatically create users option is enabled, a federation will only add users logging in to a cloud for the first time. You can only add a federated user again manually after deleting them from a federation.
To add users to organization, you must be in the admins group.
To add federation users to an organization:
-
Log in to an account that belongs to an organization administrator or owner.
-
Go to Cloud Organization.
-
In the left-hand panel, select Users .
-
In the top-right corner, click → Add federated users.
-
Select the identity federation to add users from.
-
List the name IDs of users, separating them with line breaks.
-
Click Add. This will give the users access to the organization.
If you don't have the Nebius AI command line interface yet, install and initialize it.
The folder specified in the CLI profile is used by default. You can specify a different folder using the --folder-name or --folder-id parameter.
-
View a description of the add user command:
ncp organization-manager federation saml add-user-accounts --help -
Add users by listing their name IDs separated by a comma:
ncp organization-manager federation saml add-user-accounts --name my-federation \
  --name-ids=alice@example.com,bob@example.com,charlie@example.com
To add identity federation users to the cloud:
-
Create a file with the request body, e.g.,
body.json. In the request body, specify the array of name IDs of users you want to add:{ "nameIds": [ "alice@example.com", "bob@example.com", "charlie@example.com" ] } -
Send the request by specifying the Federation ID in the parameters:
curl -X POST \
  -H "Content-Type: application/json" \
  -H "Authorization: Bearer <IAM token>" \
  -d '@body.json' \
  https://organization-manager.api.ai.nebius.cloud/organization-manager/v1/saml/federations/<federation ID>:addUserAccounts
Test the authentication process
Now that you finished configuring authentication with Active Directory, test that it runs properly:
-
Open the browser in guest or incognito mode for a clean new user simulation.
-
Follow the URL to log in to the management console:
https://console.nebius.ai/federations/<federation_ID>How to get a federation ID-
Go to Cloud Organization.
-
In the left-hand panel, select Federations .
-
Copy the ID of the federation you are configuring access for.
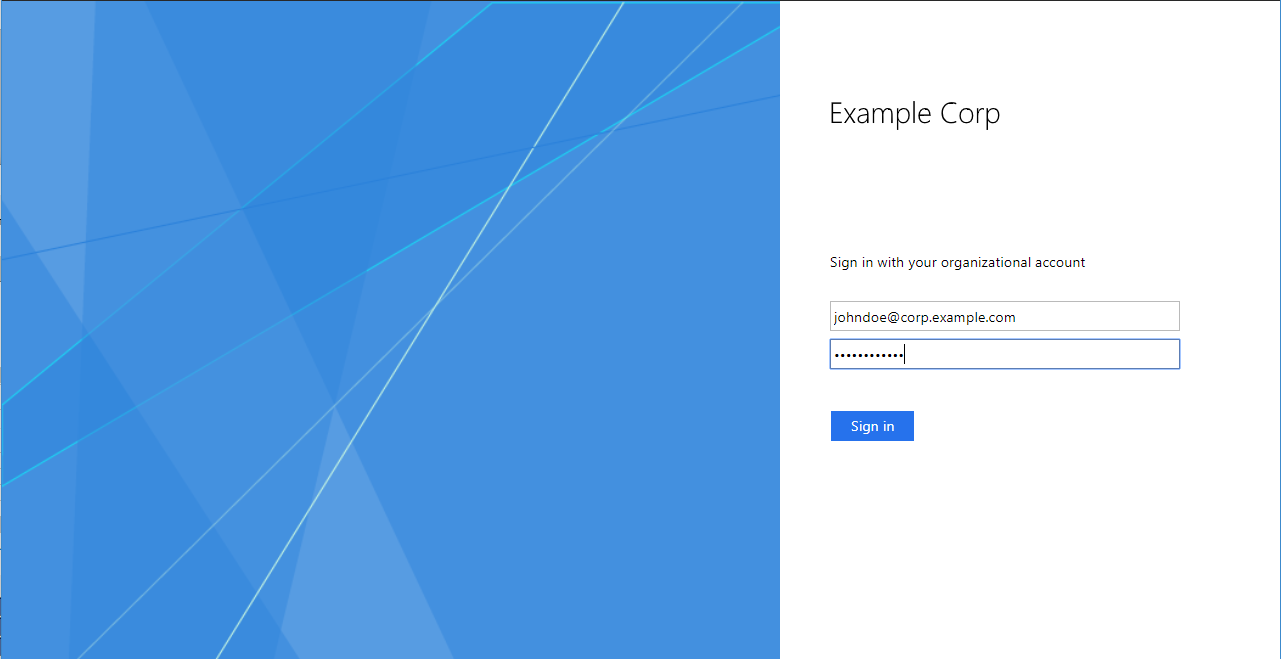
The browser forwards you to the AD FS authentication page, which by default looks as follows:
-
-
Enter your authentication data. By default, you must enter the UPN and password. Then click Sign in.
-
On successful authentication, AD FS will redirect you to the
https://console.nebius.ai/federations/<federation_ID>URL that you specified in the AD FS server settings and then to the management console home page. In the top-right corner, you can see that you are logged in to the console under an Active Directory account.
What's next
- Add new users to groups to grant them permissions.