Authentication using Keycloak
With an identity federation, you can use Keycloak to authenticate users in an organization.
Setting up authentication includes the following steps:
Getting started
To follow the steps in this section, you will need:
-
Docker. If you do not have Docker yet, install it. Make sure Docker Engine is running.
-
Keycloak local IdP server. To install and start Keycloak, run these commands:
Keycloak 20 in developer modeKeycloak 19docker run -p 8080:8080 -e KEYCLOAK_ADMIN=admin -e KEYCLOAK_ADMIN_PASSWORD=Pa55w0rd quay.io/keycloak/keycloak:latest start-devgit clone https://github.com/keycloak/keycloak-containers.git cd ./keycloak-containers/docker-compose-examples docker-compose -f keycloak-postgres.yml upNote
To enable employees on a corporate network or the internet to use Keycloak for authentication in your application, deploy the Keycloak IdP server on the network and set up a public address. Read more in the Keycloak documentation.
-
Valid certificate that is used for signing in the Keycloak service. To get it:
-
Log in to the Keycloak administrator account at:
Keycloak 17 or higherKeycloak 16 or lowerhttp://keycloak.example.com:8080/admin. ReplaceKeycloak.example.comwith your local server address, e.g.,http://localhost:8080/admin.http://keycloak.example.com:8080/auth/admin. Replacekeycloak.example.comwith your local server address, e.g.,http://localhost:8080/auth/admin.Default login parameters:
- User name or email:
admin. - Password :
Pa55w0rd.
- User name or email:
-
In the Realm Settings section, select the Keys tab.
-
In the RS256 line, click Certificate and copy the certificate value.
-
Save the certificate as a text file with the
.cerextension in the following format:-----BEGIN CERTIFICATE----- <X509Certificate value> -----END CERTIFICATE-----
You can also get the certificate through this direct link:
Keycloak 17 or higherKeycloak 16 or lowerhttp://keycloak.example.com:8080/realms/master/protocol/saml/descriptor. The certificate value is stored in the<ds:X509Certificate>...</ds:X509Certificate>tag.http://keycloak.example.com:8080/auth/realms/master/protocol/saml/descriptor. The certificate value is stored in the<ds:X509Certificate>...</ds:X509Certificate>tag. -
Creating and setting up a federation in Cloud Organization
Create a federation
-
Go to Cloud Organization.
-
In the left-hand panel, select Federations .
-
Click Create federation.
-
Give your federation a name. It must be unique within the folder.
-
You can also add a description, if required.
-
In the Cookie lifetime field, specify the period of time that must elapse before the browser asks the user to re-authenticate.
-
In the IdP Issuer field, provide the following link:
-
Keycloak 17 or higher
http://<host>:8080/realms/masterIf you set up a public address for the IdP server, specify its URL, e.g.:
http://keycloak.example.com:8080/realms/master -
Keycloak 16 or lower
http://<host>:8080/realms/masterIf you set up a public address for the IdP server, specify its URL, e.g.:
http://keycloak.example.com:8080/auth/realms/master
-
-
In the Link to the IdP login page field, provide the following link:
-
Keycloak 17 or higher
http://<host>:8080/realms/master/protocol/samlIf you set up a public address for the IdP server, specify its URL, for example:
http://keycloak.example.com:8080/realms/master/protocol/saml -
Keycloak 16 or lower
http://<host>:8080/auth/realms/master/protocol/samlIf you set up a public address for the IdP server, specify its URL, for example:
http://keycloak.example.com:8080/auth/realms/master/protocol/saml
You can only use HTTP and HTTPS in a link.
-
-
Enable Automatically create users to automatically add a new user to your organization after authentication. If this option is disabled, you will need to manually add your federated users.
A federated user is created automatically only when they log in to a cloud for the first time. If you deleted a user from a federation, you can only add them back manually.
-
To make sure that all authentication requests from Nebius AI contain a digital signature, enable the Sign authentication requests option. To complete the configuration, download and install a Nebius AI certificate. You can download the certificate in the Sign authentication requests field immediately after creating a federation.
-
Click Create federation.
If you don't have the Nebius AI command line interface yet, install and initialize it.
The folder specified in the CLI profile is used by default. You can specify a different folder using the --folder-name or --folder-id parameter.
-
See the description of the create federation command:
ncp organization-manager federation saml create --help -
Create a federation:
-
Keycloak 17 or higher
ncp organization-manager federation saml create --name my-federation \ --organization-id <organization ID> \ --auto-create-account-on-login \ --encrypted-assertions \ --cookie-max-age 12h \ --issuer "http://<host>:8080/realms/master" \ --sso-binding POST \ --sso-url "http://<host>:8080/realms/master/protocol/saml" \ --force-authn -
Keycloak 16 or lower
ncp organization-manager federation saml create --name my-federation \
    --organization-id <organization ID> \
    --auto-create-account-on-login \
    --encrypted-assertions \
    --cookie-max-age 12h \
    --issuer "http://<host>:8080/auth/realms/master" \
    --sso-binding POST \
    --sso-url "http://<host>:8080/auth/realms/master/protocol/saml" \
    --force-authn
Where:
-
name: Federation name. It must be unique within the folder. -
organization-id: Your organization ID. -
auto-create-account-on-login: Flag to enable the automatic creation of new cloud users following authentication on the IdP server.This option makes it easier to create users; however, users created this way will not be able to do anything with cloud resources.
If this option is disabled, users who are not added to the organization cannot log in to the management console, even if they authenticate with your IdP server. In this case, you can manage a list of users allowed to use Nebius AIresources.
-
encrypted-assertions: Flag that enables a digital signature for authentication requests. To complete the configuration, download and install a Nebius AI certificate. -
cookie-max-age: Time that must elapse before the browser asks the user to re-authenticate. -
issuer: IdP server ID to be used for authentication:-
Keycloak 17 or higher
http://<host>:8080/realms/masterIf you set up a public address for the IdP server, specify its URL, e.g.:
http://keycloak.example.com:8080/realms/master -
Keycloak 16 or lower
http://<host>:8080/realms/masterIf you set up a public address for the IdP server, specify its URL, e.g.:
http://keycloak.example.com:8080/auth/realms/master
-
-
sso-url: URL of the page the browser redirects the user to for authentication:-
Keycloak 17 or higher
http://<host>:8080/realms/master/protocol/samlIf you set up a public address for the IdP server, specify its URL, for example:
http://keycloak.example.com:8080/realms/master/protocol/saml -
Keycloak 16 or lower
http://<host>:8080/auth/realms/master/protocol/samlIf you set up a public address for the IdP server, specify its URL, for example:
http://keycloak.example.com:8080/auth/realms/master/protocol/saml
You can only use HTTP and HTTPS in a link.
-
-
sso-binding: Specify the Single Sign-on binding type. Most Identity Providers support thePOSTbinding type. -
force-authn: Flag that requires user re-authentication once a session expires in Nebius AI.
-
-
-
Create a file with the request body, e.g.,
body.json:-
Keycloak 17 or higher
{ "name": "my-federation", "organizationId": "<organization ID>", "autoCreateAccountOnLogin": true, "cookieMaxAge":"43200s", "issuer": "http://<host>:8080/realms/master", "ssoUrl": "http://<host>:8080/realms/master/protocol/saml", "securitySettings": { "encryptedAssertions": true, "forceAuthn": true }, "ssoBinding": "POST" } -
Keycloak 16 or lower
{
  "name": "my-federation",
  "organizationId": "<organization ID>",
  "autoCreateAccountOnLogin": true,
  "cookieMaxAge":"43200s",
  "issuer": "http://<host>:8080/auth/realms/master",
  "ssoUrl": "http://<host>:8080/auth/realms/master/protocol/saml",
  "securitySettings": {
    "encryptedAssertions": true,
    "forceAuthn": true
  },
  "ssoBinding": "POST"
}
Where:
-
name: Federation name. It must be unique within the folder. -
organizationId: Organization ID. -
autoCreateAccountOnLogin: Flag to activate the automatic creation of new cloud users after authenticating on the IdP server.
This option makes it easier to create users; however, users created this way will not be able to do anything with cloud resources.If this option is disabled, users who are not added to the organization cannot log in to the management console, even if they authenticate with your IdP server. In this case, you can manage a list of users allowed to use Nebius AIresources.
-
cookieMaxAge: Time that must elapse before the browser asks the user to re-authenticate. -
issuer: IdP server ID to be used for authentication:-
Keycloak 17 or higher
http://<host>:8080/realms/masterIf you set up a public address for the IdP server, specify its URL, e.g.:
http://keycloak.example.com:8080/realms/master -
Keycloak 16 or lower
http://<host>:8080/realms/masterIf you set up a public address for the IdP server, specify its URL,
e.g.:
http://keycloak.example.com:8080/auth/realms/master
-
-
ssoUrl: URL of the page the browser redirects the user to for authentication:-
Keycloak 17 or higher
http://<host>:8080/realms/master/protocol/samlIf you set up a public address for the IdP server, specify its URL, for example:
http://keycloak.example.com:8080/realms/master/protocol/saml -
Keycloak 16 or lower
http://<host>:8080/auth/realms/master/protocol/samlIf you set up a public address for the IdP server, specify its URL, for example:
http://keycloak.example.com:8080/auth/realms/master/protocol/saml
You can only use HTTP and HTTPS in a link.
-
-
encryptedAssertions: Flag that enables a digital signature for authentication requests. To complete the configuration, download and install a Nebius AI certificate. -
forceAuthn: Parameter that requires user re-authentication once a session expires in Nebius AI. -
ssoBinding: Specify the Single Sign-on binding type. Most Identity Providers support thePOSTbinding type.
-
-
Add certificates
While authenticating, the Cloud Organization service should be able to verify the IdP server certificate. To enable this, add the certificate to the federation:
-
In the left-hand panel, select Federations .
-
Click the name of the federation to add a certificate to.
-
At the bottom of the page, click Add certificate.
-
Enter the certificate name and description.
-
Choose how to add the certificate:
-
To add a certificate as a file, click Choose a file and specify the path to it.
-
To paste the contents of a copied certificate, select the Text method and paste the contents.
-
-
Click Add.
If you don't have the Nebius AI command line interface yet, install and initialize it.
The folder specified in the CLI profile is used by default. You can specify a different folder using the --folder-name or --folder-id parameter.
-
View a description of the add certificate command:
ncp organization-manager federation saml certificate create --help -
Add a federation certificate by specifying the certificate file path:
ncp organization-manager federation saml certificate create \
  --federation-id <federation_ID> \
  --name "my-certificate" \
  --certificate-file certificate.cer
Tip
To ensure the authentication is not interrupted when the certificate expires, we recommend adding multiple certificates to the federation, i.e. both the current one and those to use afterwards. If a certificate turns out to be invalid, Nebius AI will attempt to verify the signature with another certificate.
Creating and setting up a SAML application in Keycloak
A SAML application in Keycloak acts as an identity provider (IdP). To create and set up a SAML application:
-
Log in to the Keycloak administrator account at:
Keycloak 17 or higherKeycloak 16 or lowerhttp://keycloak.example.com:8080/admin. ReplaceKeycloak.example.comwith your local server address, e.g.,http://localhost:8080/admin.http://keycloak.example.com:8080/auth/admin. Replacekeycloak.example.comwith your local server address, e.g.,http://localhost:8080/auth/admin.Default login parameters:
- User name or email:
admin. - Password :
Pa55w0rd.
- User name or email:
-
Create a SAML application:
Keycloak 19 or higherKeycloak 18 or lower-
In the left-hand panel, select Clients. Click Create client.
-
In the Client ID field, enter the URL to redirect users to after successful authentication:
https://auth.nebius.ai/federations/<federation_ID>How to get a federation ID-
Go to Cloud Organization.
-
In the left-hand panel, select Federations .
-
Copy the ID of the federation you are configuring access for.
-
-
In the Client type field, select saml.
-
Click Save.
-
In the left-hand panel, select Clients. Click Create.
-
In the Client ID field, enter the URL to redirect users to after successful authentication:
https://auth.nebius.ai/federations/<federation_ID>How to get a federation ID-
Go to Cloud Organization.
-
In the left-hand panel, select Federations .
-
Copy the ID of the federation you are configuring access for.
-
-
In the Client Protocol field, select saml.
-
Click Save.
-
-
Set up the SAML application parameters in the Settings tab:
-
Specify the
https://auth.nebius.ai/federations/<federation_ID>redirect URL in the following fields:Keycloak 19 or higherKeycloak 18 or lower- Home URL.
- Valid Redirect URIs
- IDP Initiated SSO Relay State
- Valid Redirect URIs
- Base URL
- IDP Initiated SSO Relay State
-
Enable the following options:
- Include AuthnStatement
- Sign Assertions
- Force POST Binding
- Front Channel Logout
-
In the Signature Algorithm field, select RSA_SHA256.
-
In the SAML Signature Key Name field, select CERT_SUBJECT.
-
Select the format you need from the list in the Name ID Format field. To make sure this format is provided regardless of the Cloud Organization settings, enable the Force Name ID format option.
-
Click Save.
-
-
If you enabled the Sign authentication requests option when creating a federation in Cloud Organization, set up digital signature verification in the SAML application:
Keycloak 19 or higherKeycloak 18 or lower-
In the SAML application Keys tab, enable Encrypt Assertions and disable Client Signature Required.
-
Select the Import method for Client Signature Required.
-
In the Archive Format field, select Certificate PEM. (You might need to generate certificates first so that clicking Import key makes the Certificate PEM option available.)
-
Click Browse and select the certificate to use for signing authentication requests. The certificate is available on the Cloud Organization federation information page in the Sign authentication requests field.
-
Click Confirm.
-
In the SAML application settings, select Encrypt Assertions and Client Signature Required and save the application to update the available tabs.
-
In the SAML application's Keys tab, locate the Signing Key and Encryption Key sections and click Import.
-
In the Archive Format field, select Certificate PEM.
-
Click Select file and select the certificate to be used for signing authentication requests. The certificate is available on the Cloud Organization federation information page in the Sign authentication requests field.
-
Click Import.
-
-
In the SAML application Keys tab, enable Encrypt Assertions and Client Signature Required.
-
Select the Import method for both options.
-
In the Archive Format field, select Certificate PEM. (You might need to generate certificates first so that clicking Import key makes the Certificate PEM option available.)
-
Click Browse and select the certificate to use for signing authentication requests. The certificate is available on the Cloud Organization federation information page in the Sign authentication requests field.
-
Click Confirm.
-
Add users:
-
In the left-hand panel, select Users.
-
Click Add user and specify user data.
-
Click Save.
-
In the Credentials tab, click Set Password and enter a password.
-
Adding users to Cloud Organization
If you did not enable the Automatically create users option when creating a federation, you will have to add federated users to your organization manually.
To do this, you will need user Name IDs. They are returned by the IdP server along with a response confirming successful authentication.
If the Automatically create users option is enabled, a federation will only add users logging in to a cloud for the first time. You can only add a federated user again manually after deleting them from a federation.
To add users to an organization, you must be in its admins group.
-
Log in to an account that belongs to an organization administrator or owner.
-
Go to Cloud Organization.
-
In the left-hand panel, select Users .
-
In the top-right corner, click → Add federated users.
-
Select the identity federation to add users from.
-
List the Name IDs of users, separating them with line breaks.
-
Click Add. This will give the users access to the organization.
If you don't have the Nebius AI command line interface yet, install and initialize it.
The folder specified in the CLI profile is used by default. You can specify a different folder using the --folder-name or --folder-id parameter.
-
View a description of the add user command:
ncp organization-manager federation saml add-user-accounts --help -
Add users by listing their Name IDs separated by a comma:
ncp organization-manager federation saml add-user-accounts --id <federation_ID> \
  --name-ids=alice@example.com,bob@example.com,charlie@example.com
Where:
id: Federation ID.name-ids: User name IDs.
To add identity federation users to the cloud:
-
Create a file with the request body, e.g.,
body.json. In the request body, specify the array of Name IDs of users you want to add:{ "nameIds": [ "alice@example.com", "bob@example.com", "charlie@example.com" ] } -
Send the request by specifying the Federation ID in the parameters:
$ curl -X POST \
  -H "Content-Type: application/json" \
  -H "Authorization: Bearer <IAM token>" \
  -d '@body.json' \
  https://organization-manager.api.ai.nebius.cloud/organization-manager/v1/saml/federations/<federation ID>:addUserAccounts
Setting up user attribute mappings
Following user authentication, the IdP server will send the user a SAML message via the browser containing:
-
Information about successful authentication.
-
User attributes such as a list of roles, the user's first and last names, and email address.
You can set up a mapping between the SAML message attributes and the personal data stored on the IdP server. To do this:
-
Enable the option for mapping the identity provider roles and Cloud Organization:
-
In the left-hand panel, select Client Scopes → role_list.
-
Go to the Mappers tab and select role list.
-
Enable the Single Role Attribute option.
-
-
Set up the attributes to provide to Nebius AI:
Keycloak 19 or higherKeycloak 18 or lower-
In the left-hand panel, select Client, open your SAML application settings, and go to role_list.
-
In the Client Scopes tab, select optional next to role_list and click the line with the same name as your client.
-
In the window that opens, click Add predefined mappers.
-
Select the attributes you need in the list and click Add. The following user attributes are available in Keycloak by default:
X500 email: Email address.X500 surname: Last name.X500 givenName: First name.role list: List of roles.
-
You can create additional user attributes such as a phone number. To do this, click Add mappers -> By configuration -> User Property, select User Attribute in the Configure a new mapper table, and set attribute parameters.
-
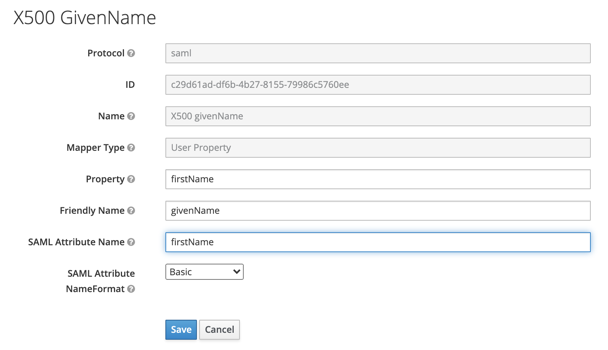
Sync Keycloak attributes and Cloud Organization: open an attribute and edit the SAML Attribute Name value. You can find the SAML Attribute Name values supported in Cloud Organization below.
-
In the left-hand panel, select Clients and open your SAML application's settings.
-
In the Mappers tab, click Add Builtins.
-
Select the desired attributes in the list and click Add selected. The following user attributes are available in Keycloak by default:
X500 email: Email address.X500 surname: Last name.X500 givenName: First name.role list: List of roles.
-
You can create additional user attributes such as a phone number. To do this, click Create, select User Attribute in the Mapper Type field, and set attribute parameters.
-
Sync Keycloak attributes and Cloud Organization: open an attribute and edit the SAML Attribute Name value. You can find the SAML Attribute Name values supported in Cloud Organization below.
-
-
If you created additional attributes, add them to user parameters:
-
In the left-hand panel, select Users, open the user parameters, and go to the Attributes tab.
-
In the Key field, enter the Name given to the additional attribute.
-
In the Value field, enter the user data to include in the attribute.
Note
By default, the Value field is limited to 256 characters. Attributes may contain more characters, for example, a Base64-encoded profile image. To add such a value, change the field data type in the internal Keycloak storage in the
user_attributetable. -
Click Add and then click Save.
-
| User data | Comment | SAML Attribute Name |
|---|---|---|
| Last name | Used for search in Nebius AI services. Value length limit: 64 characters. |
lastName |
| Name | Used for search in Nebius AI services. Value length limit: 64 characters. |
firstName |
| Full name | Displayed in Nebius AI services. Value length limit: 64 characters. |
name |
| Used to send notifications from Nebius AI services. Example: smith@example.com.Value length limit: 256 characters. |
email |
|
| Phone | Used to send notifications from Nebius AI services. Example: . Value length limit: 64 characters. |
phone |
| Profile image | Displayed in Nebius AI services. The image must be provided in Base64 format. Value length limit: 204800 characters. |
thumbnailPhoto |
Warning
The thumbnailPhoto attribute value exceeding the length limit is ignored. If the value of a different attribute exceeds the limit, the value part that goes beyond the limit is truncated.
Attribute mapping example:
Authentication
When you finish setting up SSO, test that everything works properly:
-
Open your browser in guest or private browsing mode.
-
Follow the URL to log in to the management console:
https://console.nebius.ai/federations/<federation_ID>How to get a federation ID-
Go to Cloud Organization.
-
In the left-hand panel, select Federations .
-
Copy the ID of the federation you are configuring access for.
The browser will redirect you to the Keycloak authentication page.
-
-
Enter your credentials and click Sign in.
On successful authentication, the IdP server will redirect you to the https://auth.nebius.ai/federations/<federation_ID> URL that you specified in the Keycloak settings, and then to the management console home page. In the top-right corner, you will be able to see you are logged in to the console as a federated user.
What's next
- Add new users to groups to grant them permissions.